Microsoft 365 Outlook Basics l
Microsoft Outlook helps you send and receive emails. Depending on the Microsoft 365 edition you purchased, you may use Microsoft Outlook as a desktop app, or Android app, or an iPhone app. If you don’t have access to these, you can always fall back to your Microsoft 365 cloud-based Outlook app.
Apart from sending and receiving mail, Microsoft Outlook also allows you to:
- Add tasks to your calendar
- View your upcoming activities (like meetings, tasks, etc.) on your calendar
- Set up a meeting
- Add contacts
- Add notes using OneNote
- Access other apps like Bookings, OneDrive, MS Word, MS Excel, etc.,
How to access Microsoft Outlook in Microsoft 365?
You can access Microsoft Outlook using:
- The Outlook icon in the left pane
- The App launcher
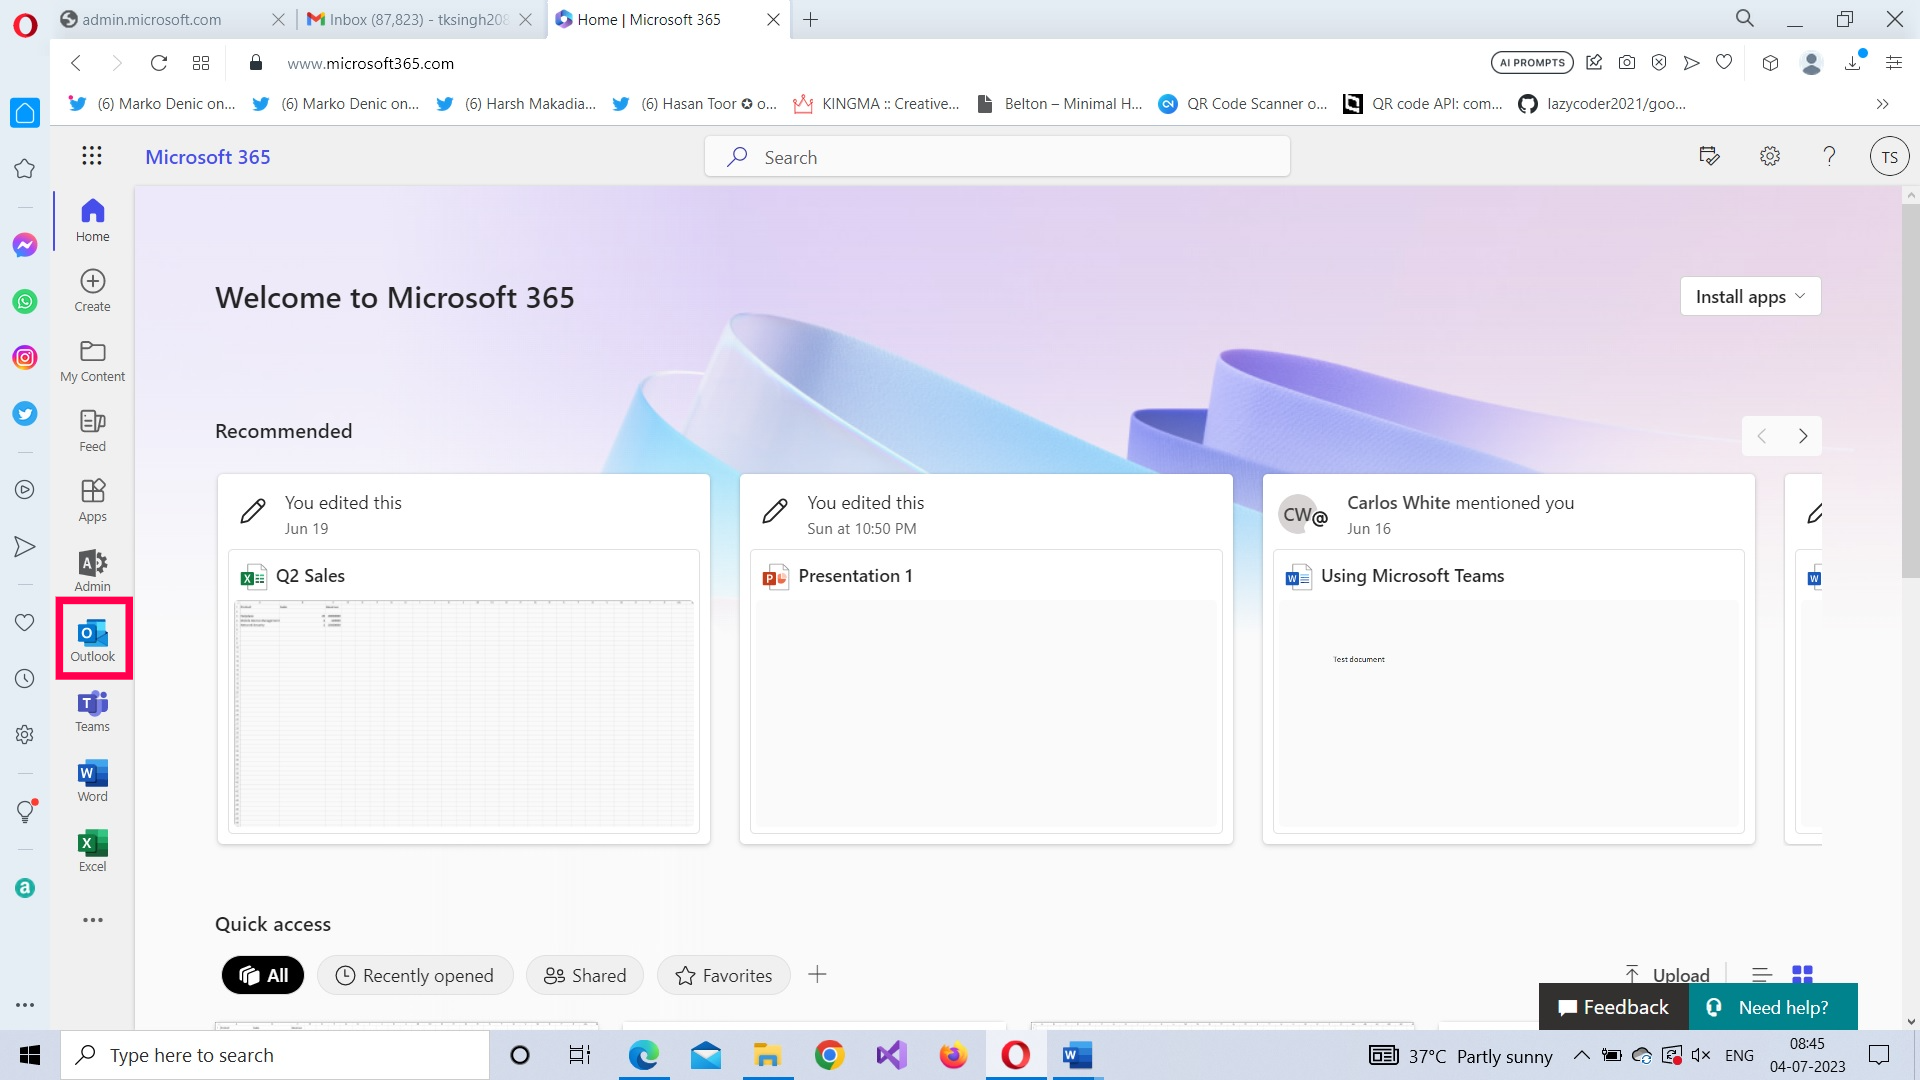
The Outlook icon in the left pane
After you sign in to your Microsoft 365 portal, click the Outlook icon available in the left pane as shown in Figure 1.
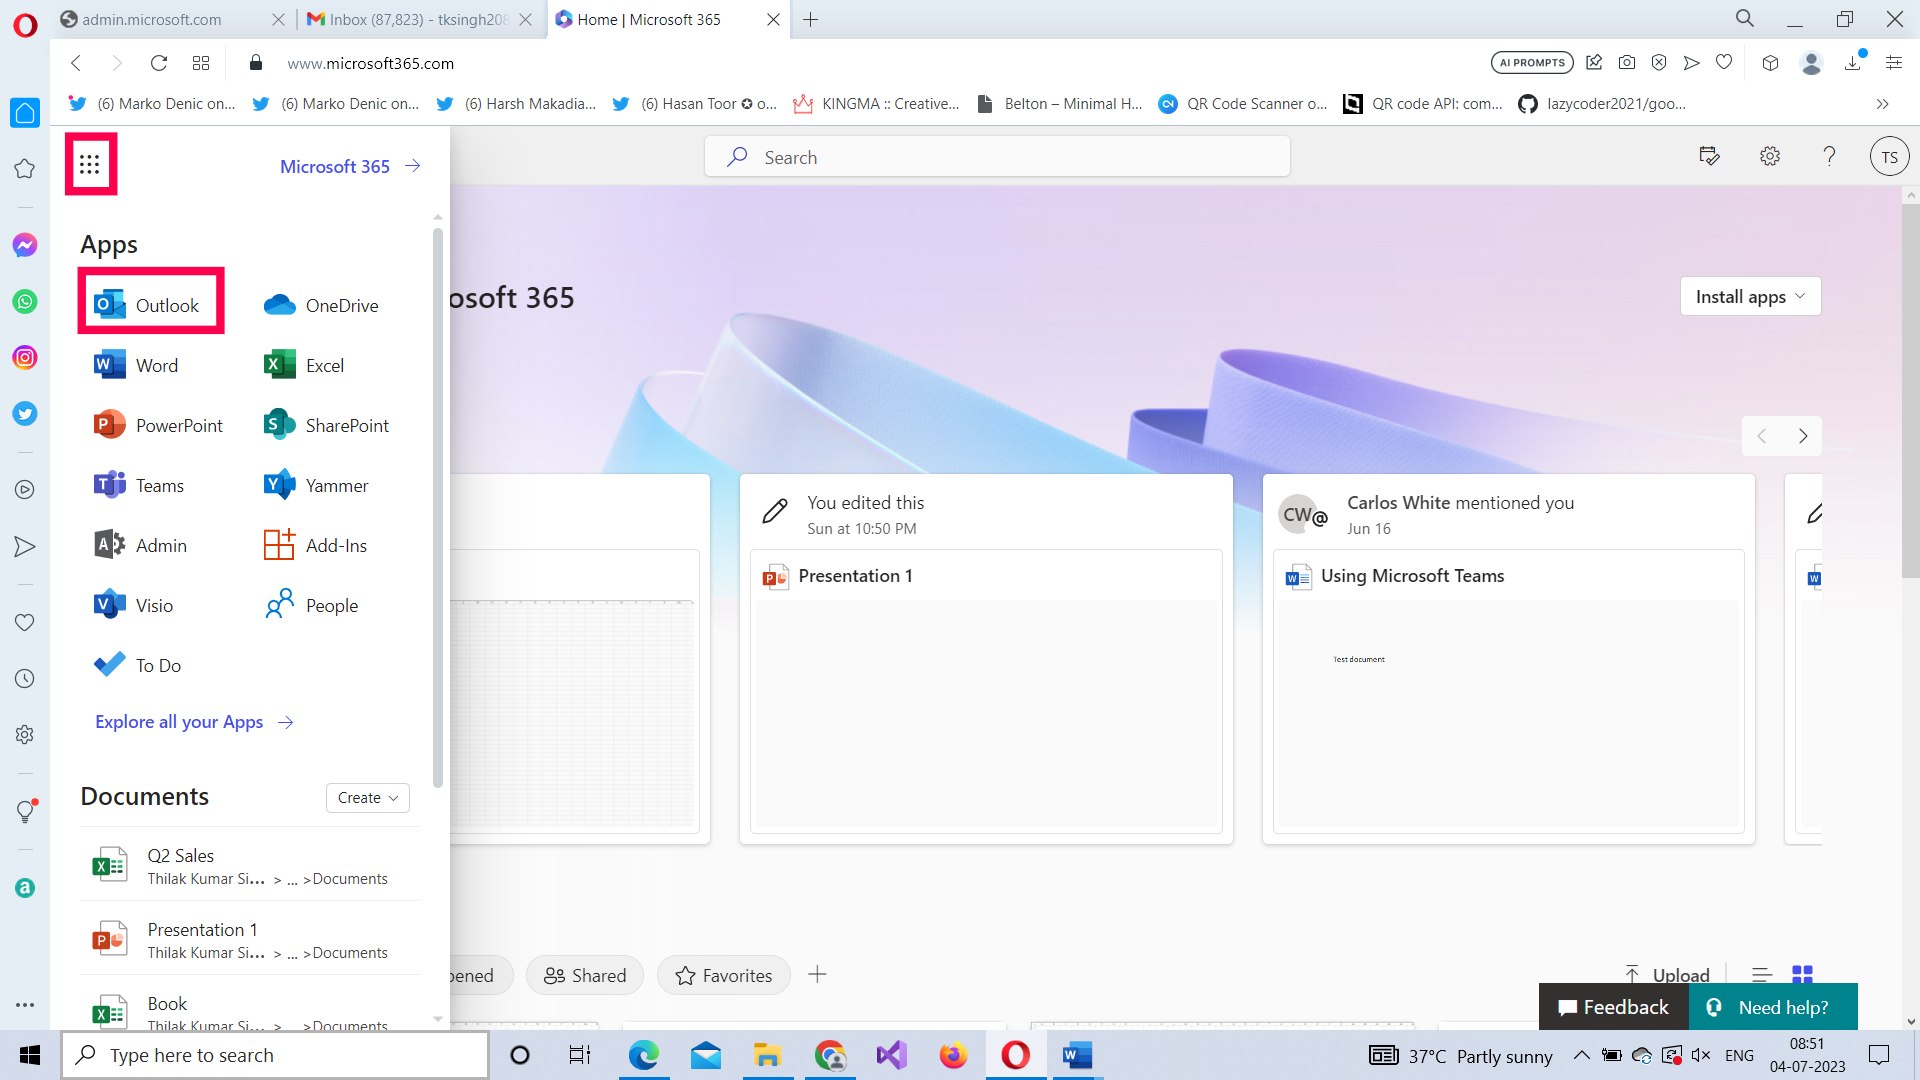
Using the App Launcher
Click the app launcher and select Outlook app as shown in Figure 2.
What are the components of Microsoft Outlook 365?
The outlook can be broadly categorized into six sections as shown in Figure 3.
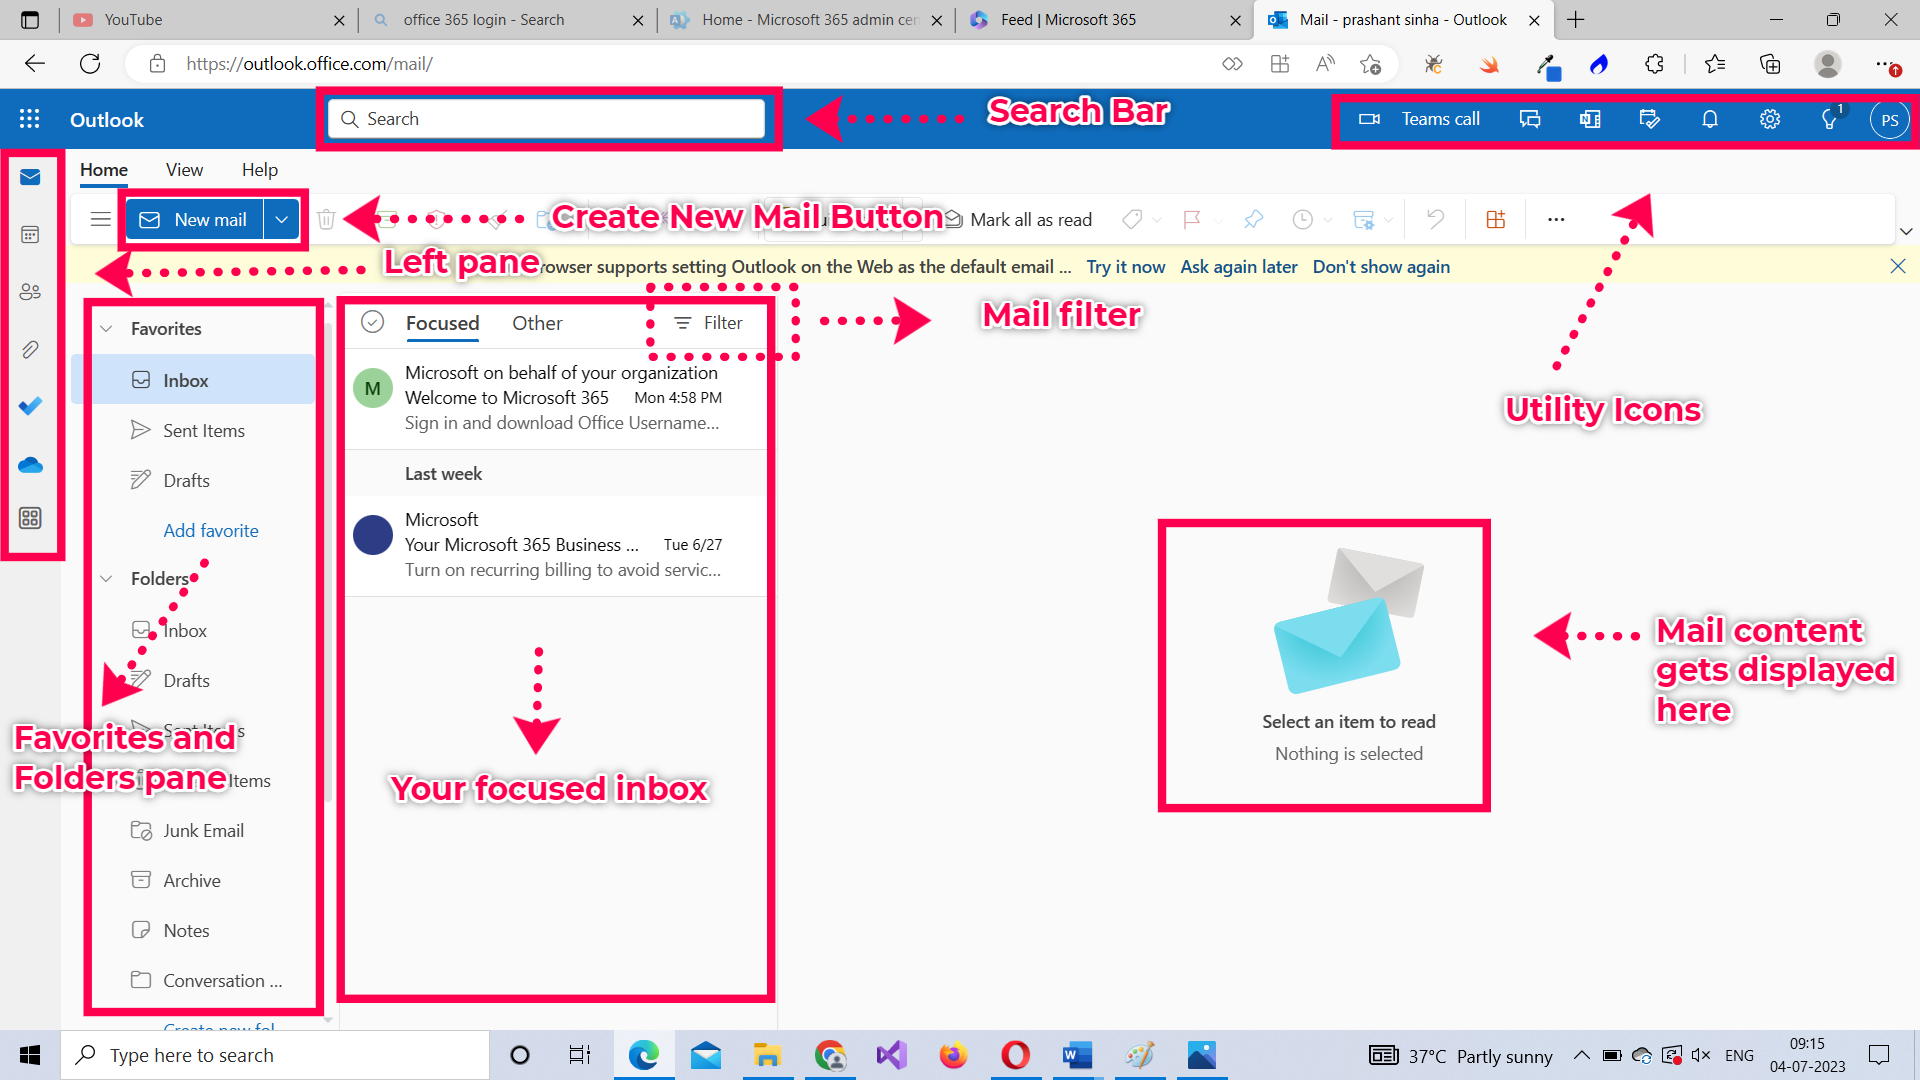
- Mail content: The empty screen in the center. This is where your email’s content is displayed. It is empty when no mail is selected from the inbox.
- The App launcher
- Inbox: This is where all your emails get listed. They are split into two different categories: i) Focused and ii) Other. More on these categories later. A filter is also available that helps you filter emails based on your requirement.
- Your email folders: Your emails are grouped into different folders like sent items, drafts, deleted items, and junk mail etc., Your favorite folders too get displayed here. More on email files and folders later.
- New mail button: Lets you compose new emails. It has additional features hidden away in the dropdown beside it which we’ll look into later.
- The left pane: Your email-related activities like the calendar, contacts, and files can be accessed here. You also get access to certain apps like To Do, Bookings, etc., from this section.
- The search bar: This lets you search for emails. An advanced search filter is also available apart from the basic search.
- The utility icons: These are available in the top right corner. They help you join teams meetings and chats, access your OneNote notes, calendar, notifications among other things.
We’ll look at each of these sections in detail, as we try to understand how basic operations like composing a mail, replying to a mail and more can be done using Microsoft Outlook 365.
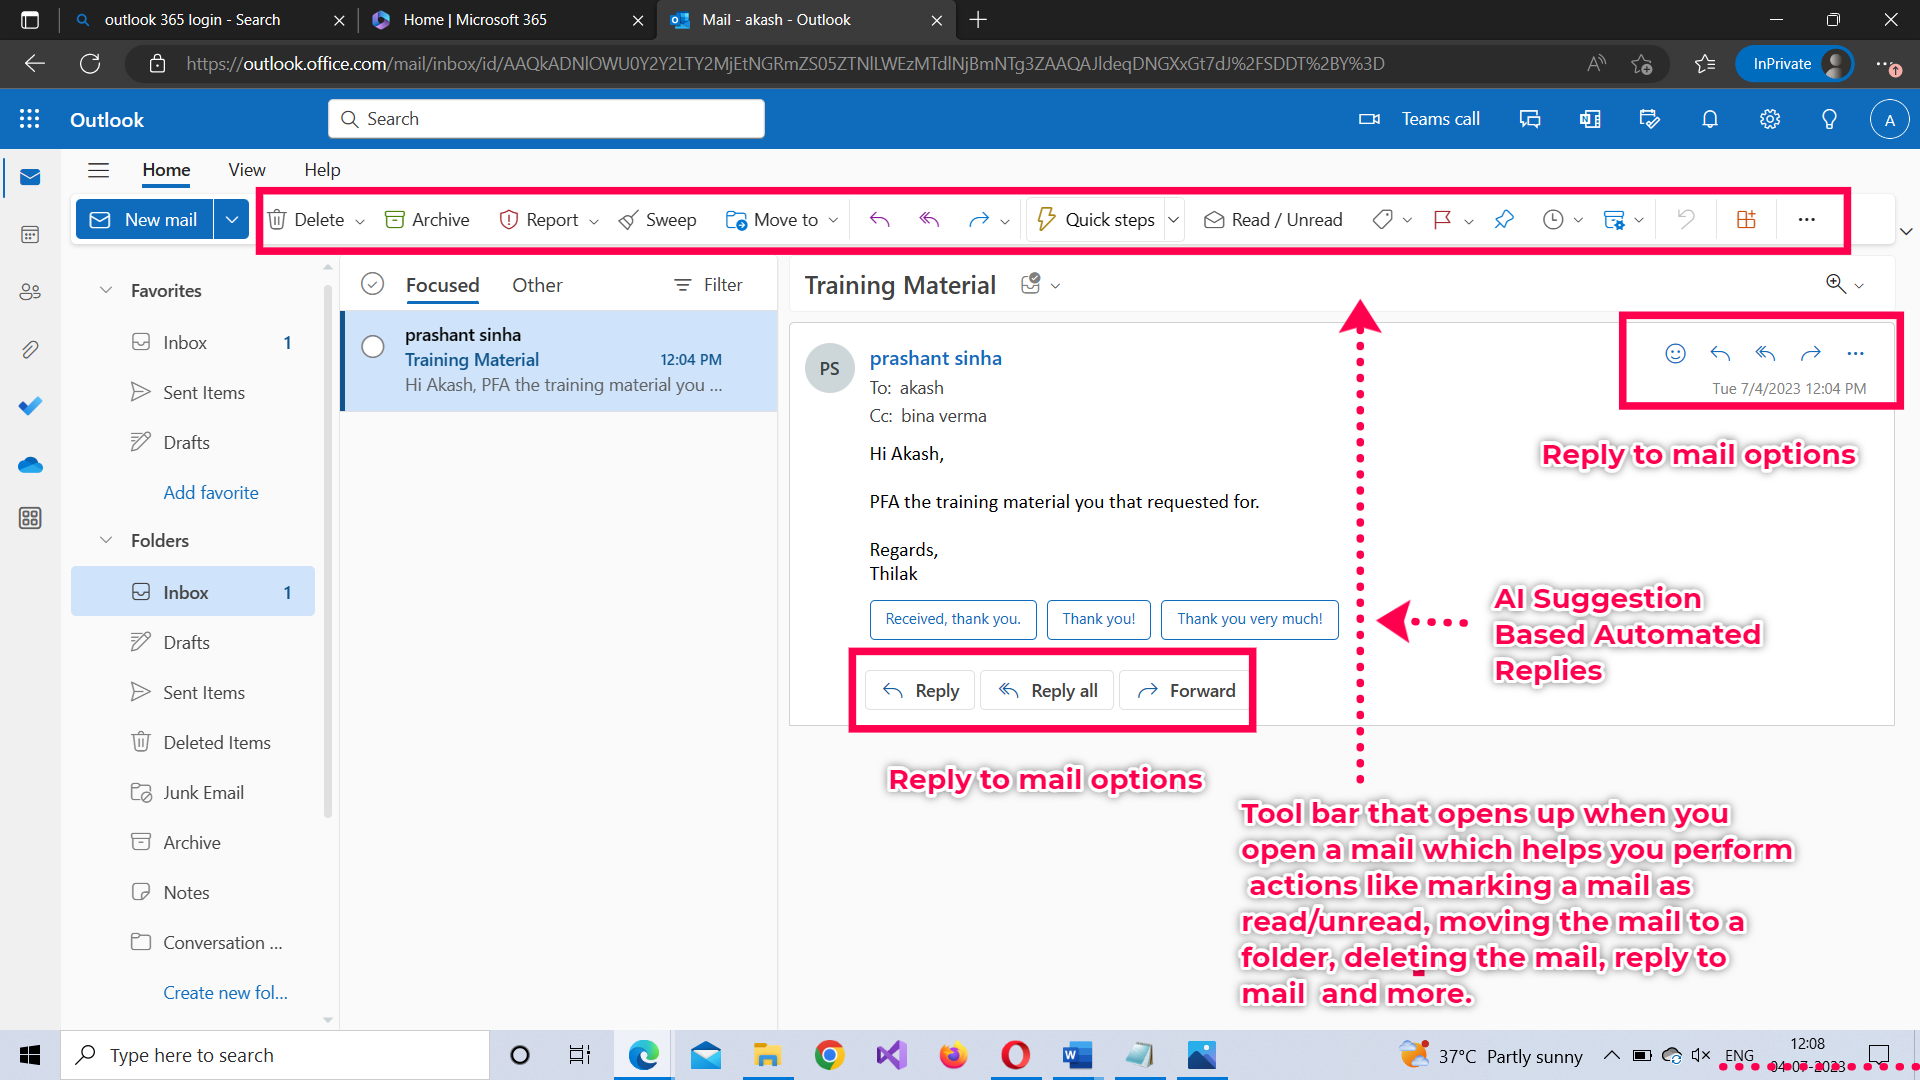
How to view or read emails in Microsoft Outlook 365?
Just click on the mail you want to read. The mail’s content opens to your right as shown in Figure 4.

Next, let’s focus on the primary action you take after reading a mail. That is, reply to it.
How to reply to emails in Microsoft Outlook 365?
When you open a mail, you get exposed to a bunch of options that help you deal with the mail as shown in Figure 5. (We’ll look into the toolbar options later).
There are three ways in which you can reply to a mail:
- Reply: sends a reply to the sender of the mail, avoiding those who are Cc’ed in it.
- Reply all: sends a reply to all of those who are involved in the mail, be it the sender or those CC’ed in it.
- Reply all by meeting: sets up a meeting and sends the meeting details as a reply to all parties involved.
How to reply to a mail?
You can either use the Reply button at the bottom of the mail or the Reply icon available to the right of the mail as shown in Figure 5. Clicking either of these leads you to the mail composer as shown in Figure 6.
Note:The toolbar too contains a reply icon but the ones closer to your mail are the easiest to get your hands on.
Write your reply and click the Send button. Your reply gets sent.
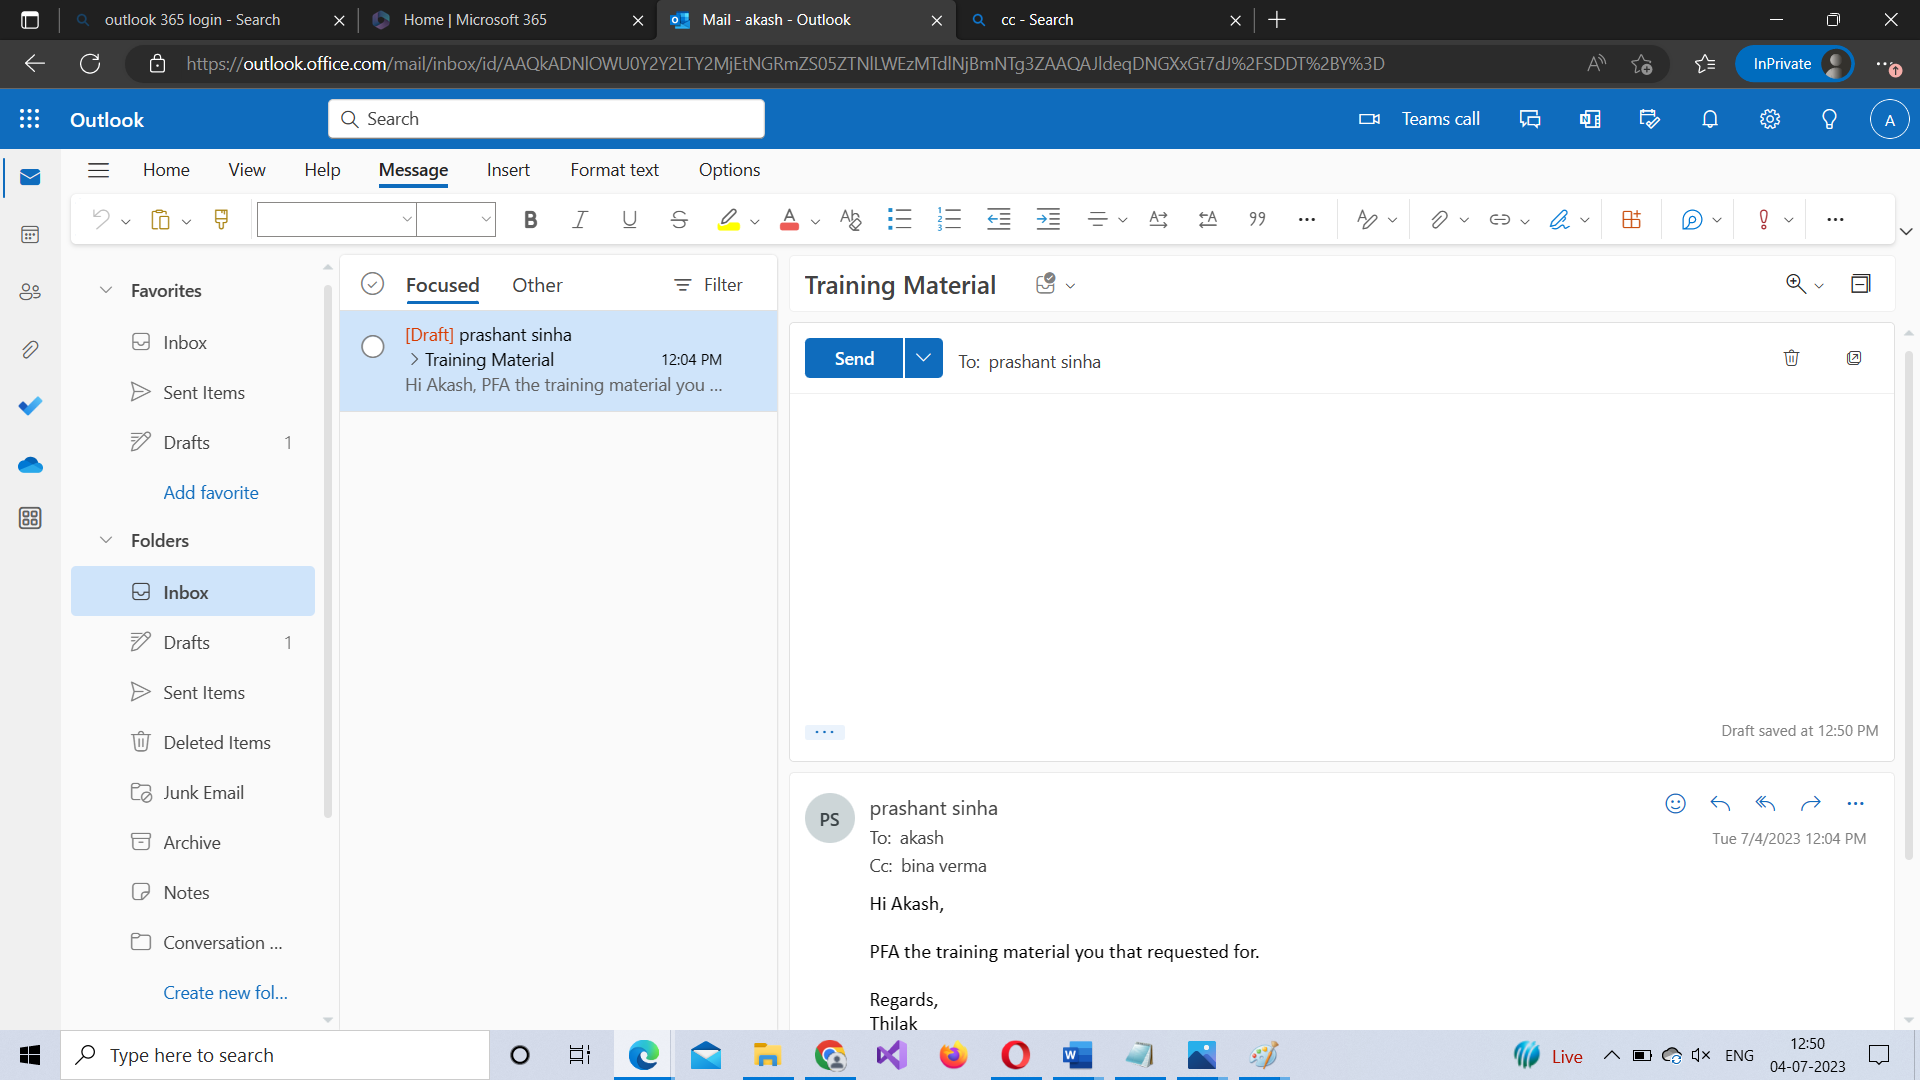
Note: You can also schedule the reply to be sent at a specific date and time. You can do this by clicking the dropdown beside the Send button and selecting the Schedule Send option. Doing so opens the Schedule Send dialog box as shown in Figure 7 which lets you specify the date and time at which you want the reply to be sent.
How to reply all to a mail?
You can either use the Reply All button at the bottom of the mail or the Reply All icon available to the right of the mail as shown in Figure 8. Clicking either of these leads you to the mail composer as shown in Figure 9.
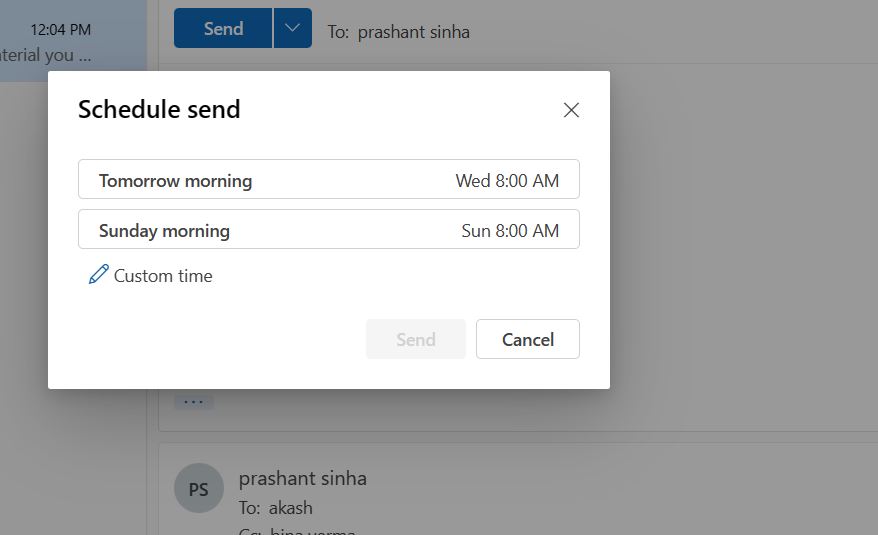
Write your reply and click the Send button. Your reply gets sent.
Note: You can also schedule the reply to be sent at a specific date and time. You can do this by clicking the dropdown beside the Send button and selecting the Schedule Send option. Doing so opens the Schedule Send dialog box as shown in Figure 7 which lets you specify the date and time at which you want the reply to be sent.
How to reply all by meeting to mail?
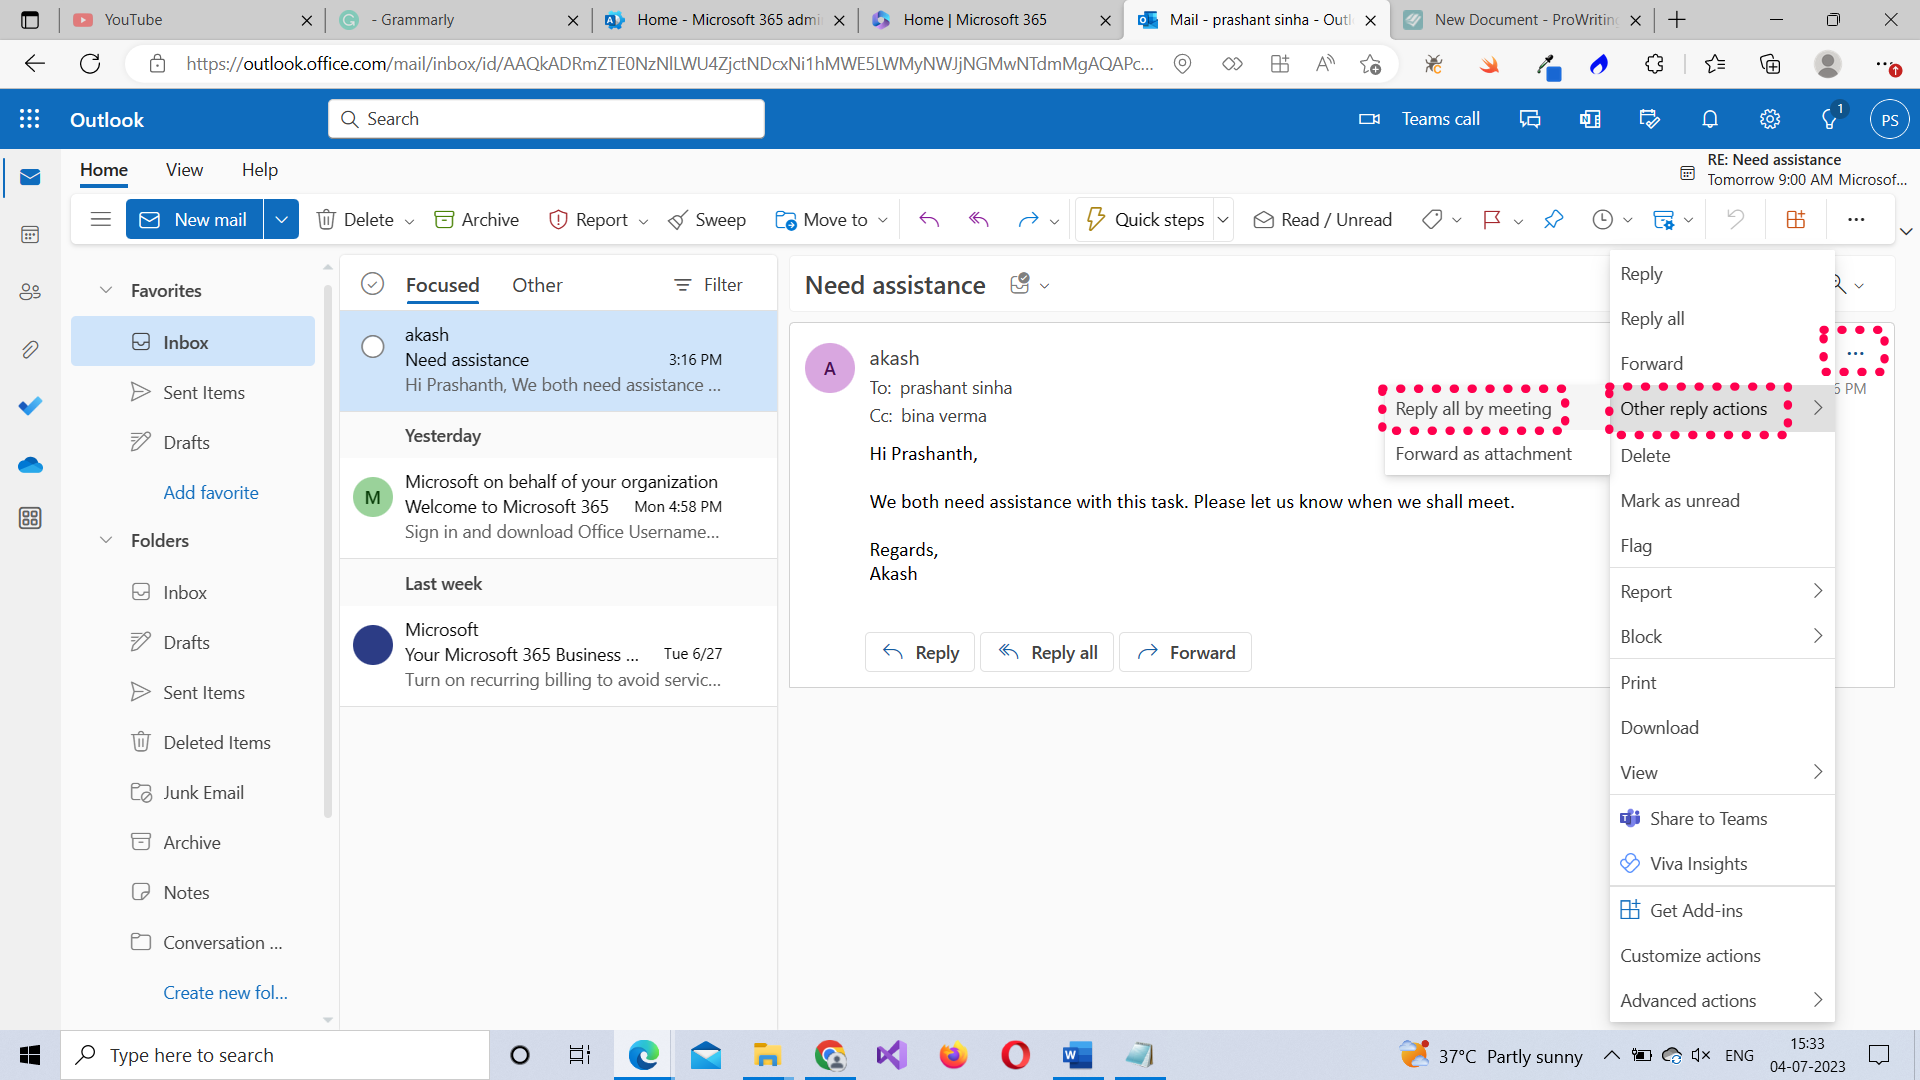
Click the more options in the reply pane available to the right of your mail and select Other reply actions Reply all by meeting option as shown in Figure 12. Doing so opens the meetings setup dialog box as shown in Figure 13.
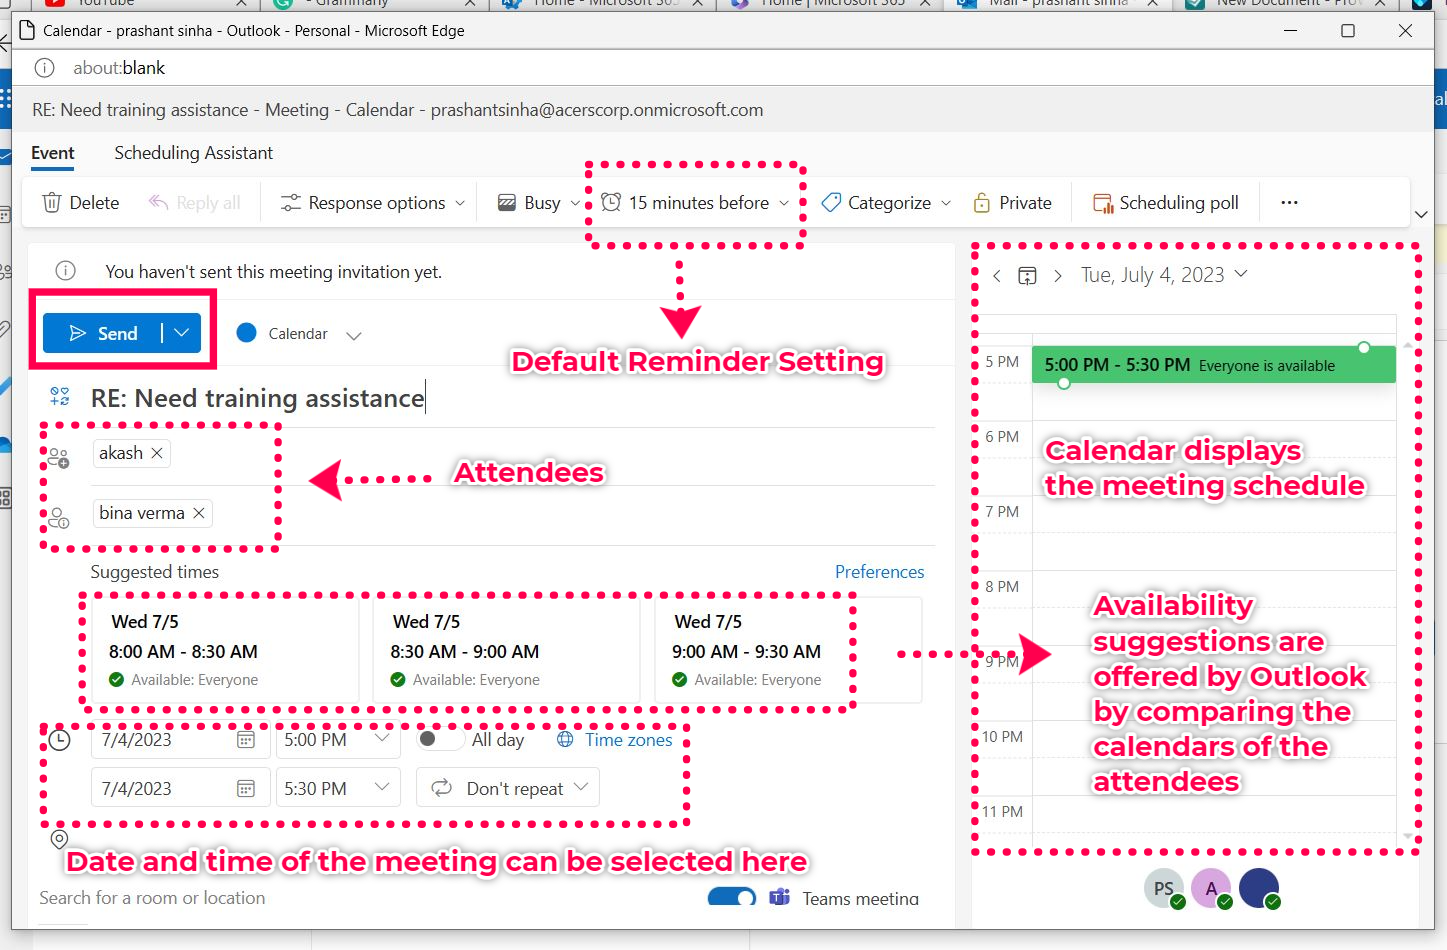
- Select the date and time for the meeting: You can either use the suggested times or manually choose the schedule for the meeting.
- Note: Suggested times are offered by the Outlook app after comparing the calendars of the participants with each other and ensuring no one is busy at the proposed time. So, it’s best to go by the suggested times than manually choosing one on your own.
- Set up meeting reminder: The default setting is to remind participants of the meeting 15 minutes before it starts. But this can be changed to suit your requirements.
- Choose meeting participants: All the participants in the email become the meeting’s participants by default. But you can choose to exclude certain people, if necessary.
- Note: Direct recipients of the meeting’s details become required attendees. And others become optional attendees.
Once the meeting details are set up, click Send button. The meeting’s details get dispatched as mail to the attendees.
Note: By default, the meeting is set up as a teams meeting. But you can modify this and make it an in-person meeting, if necessary.
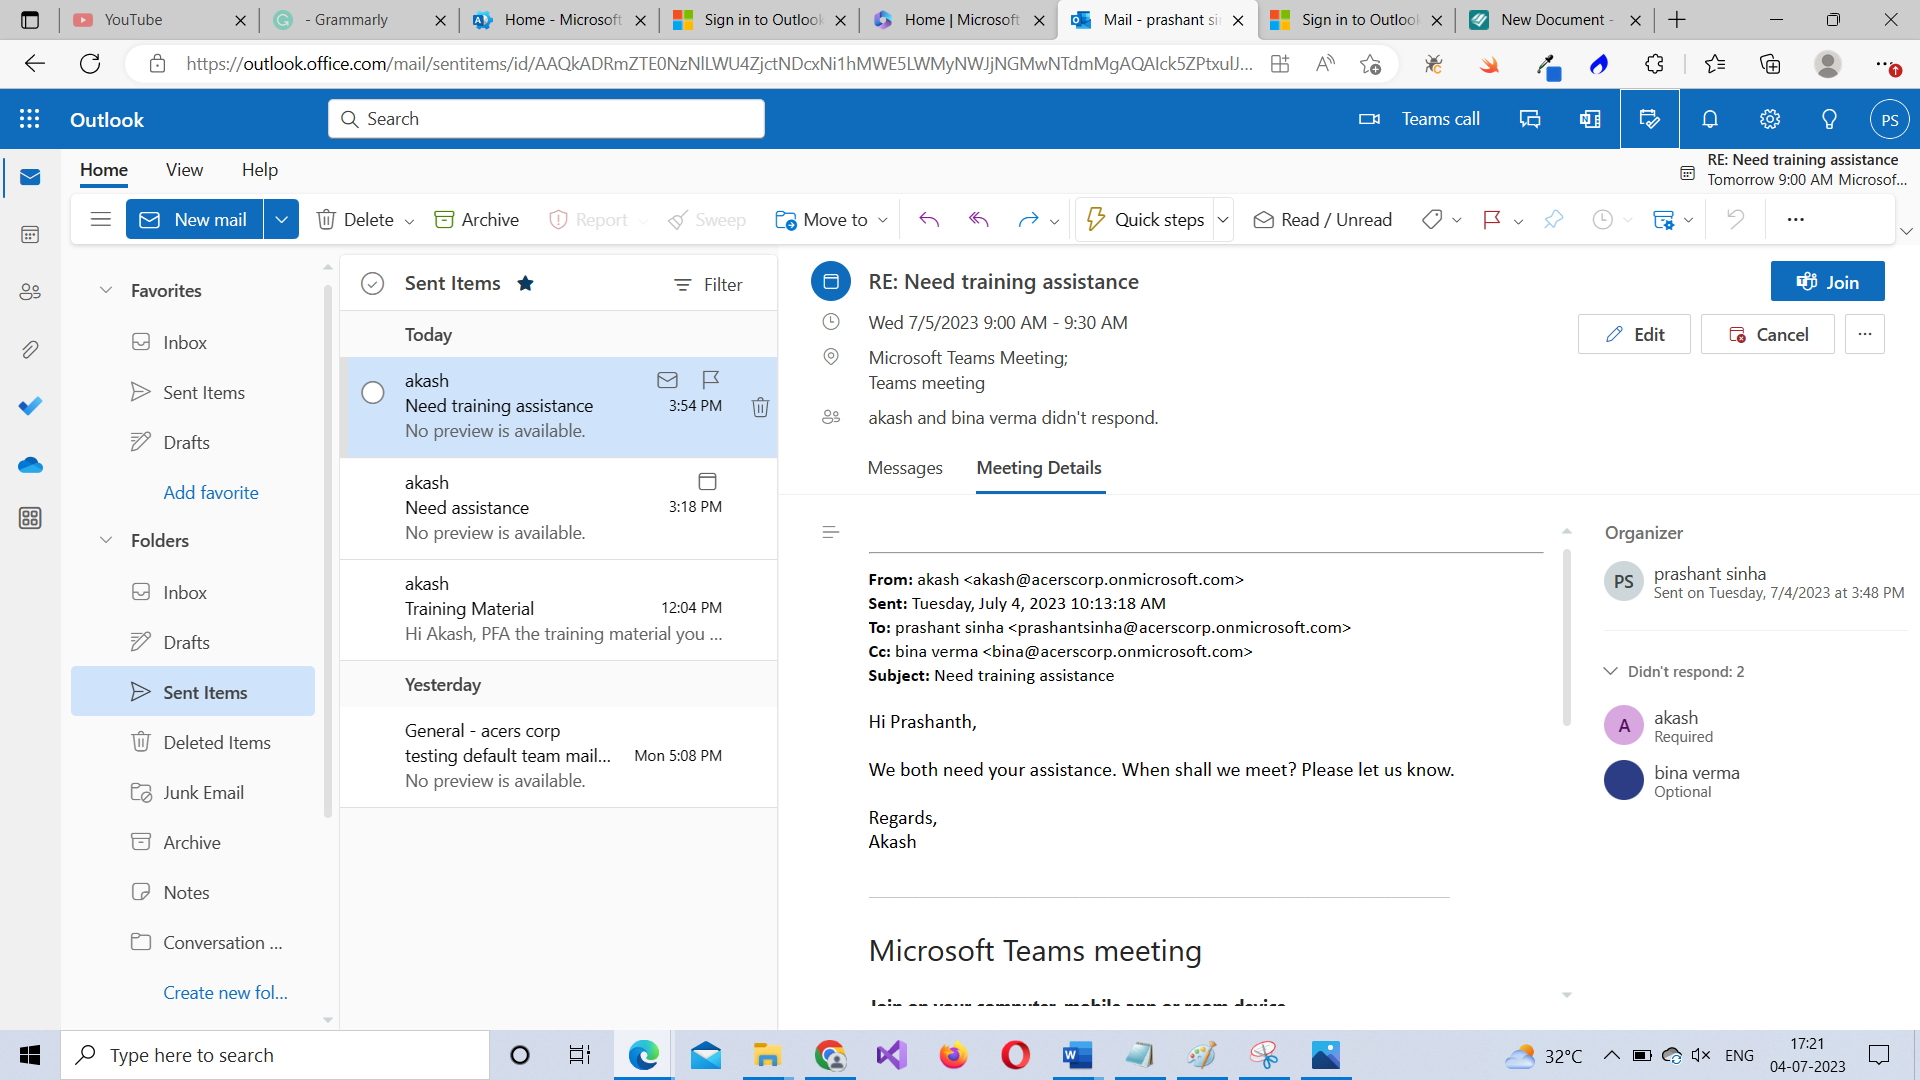
How to find out whether the meeting was set up successfully?
You can check your Sent Items folder and you’ll see the details of the meeting you configured listed there as shown in Figure 14. But a more efficient way is to check for your meeting’s details in the Outlook calendar by clicking the Calendar icon in the left pane as shown in Figure 15.

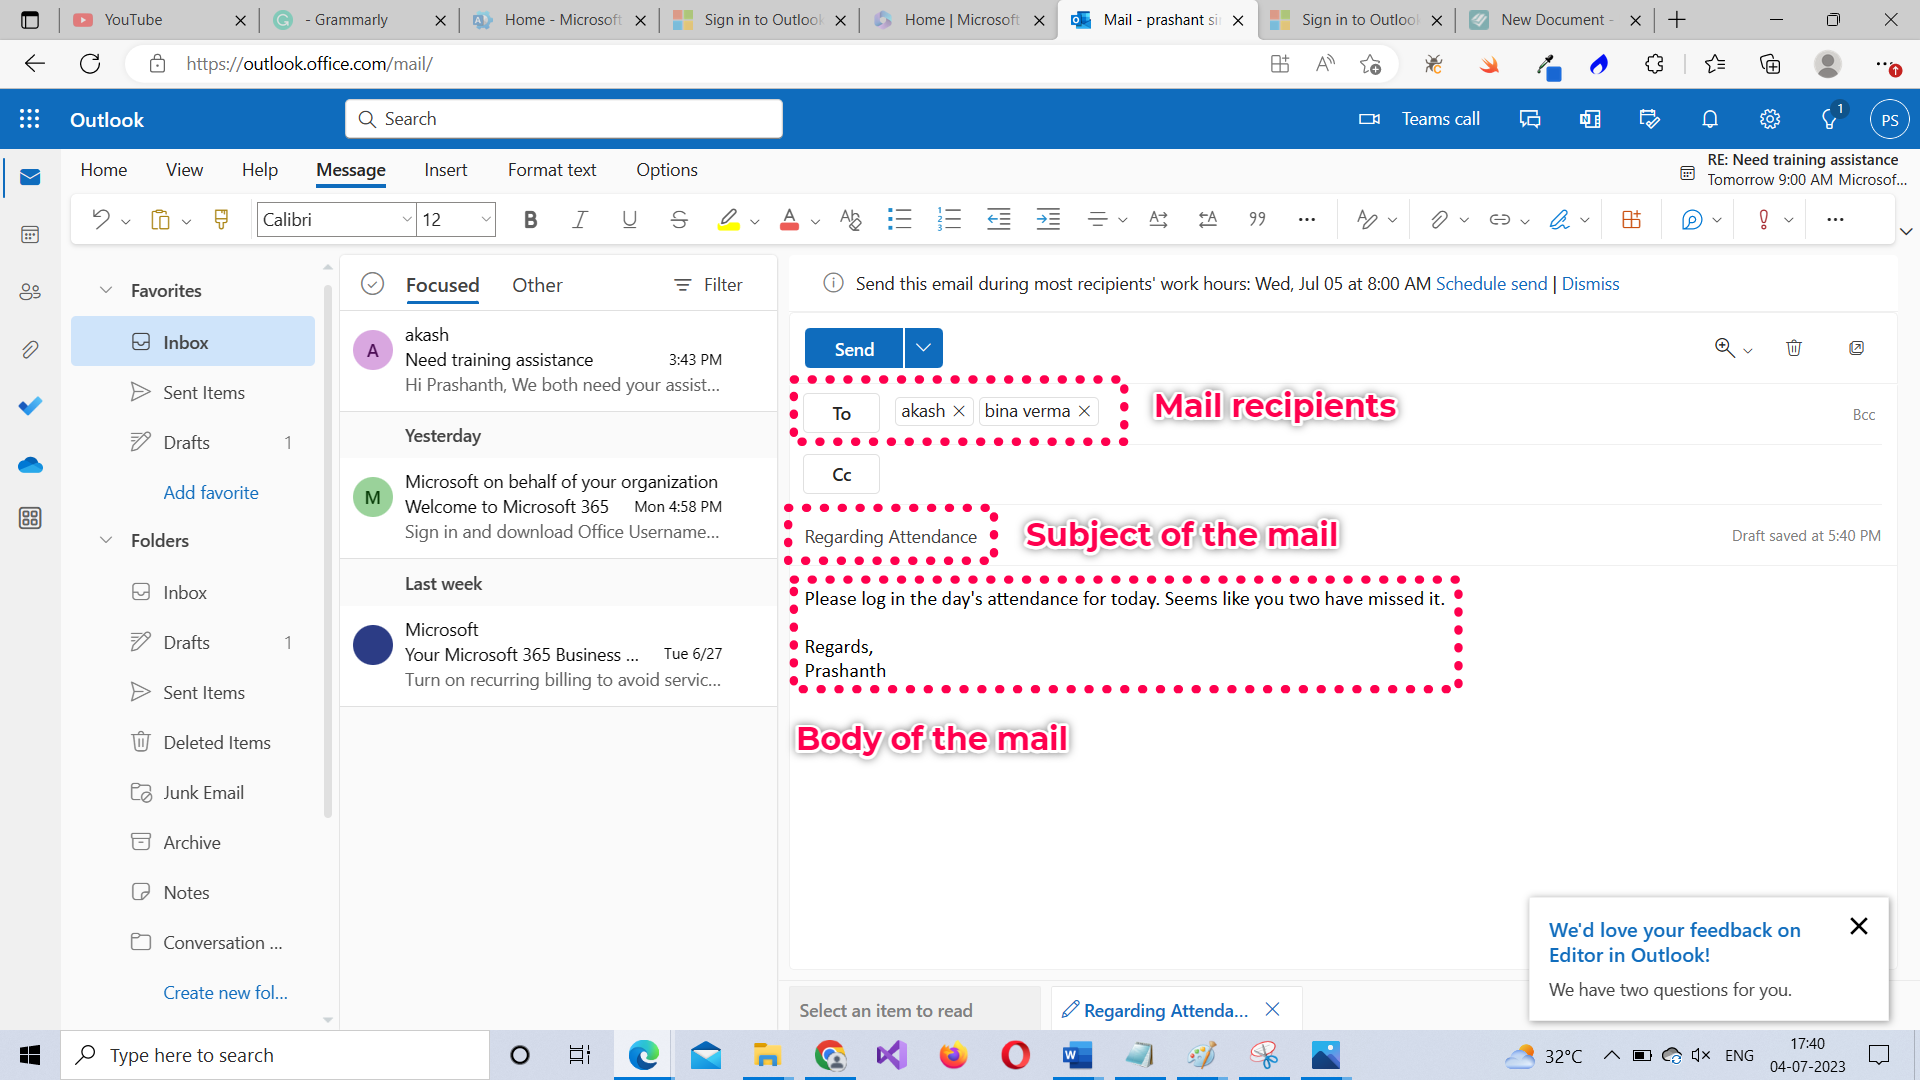
How to send mail in Microsoft Outlook 365?
Click the New mail button shown in Figure 16 and you’ll be taken to the mail composer shown in Figure 17. Once in the mail composer, type your mail, add a subject and the email addresses of your email’s recipients in the To and Cc sections respectively, and then click Send button. Your mail gets sent successfully.
What’s next?
Now that we have covered the basics of Outlook 365, in the next article let’s dive deep into how you can efficiently manage your mails by grouping them into folders, moving them from one folder to another, configuring mail rules, automating your mail and much more that can make your professional life easy.
Microsoft 365 Beginner Series -- Read More
What is Microsoft 365? What does it offer? How to sign up?Microsoft 365 Home Page
Microsoft 365 Home Page Continued
Microsoft 365 Admin Center Basics
Learning Microsoft 365 Outlook Basics I
Microsoft 365 Outlook Basics II -- Using the Microsoft 365 Outlook Toolbar
Microsoft 365 Outlook Basics III -- Microsoft 365 Outlook Meetings and Scheduling Poll
Microsoft 365 Outlook Basics IV -- Microsoft 365 Outlook Group
Microsoft Teams Basic Training